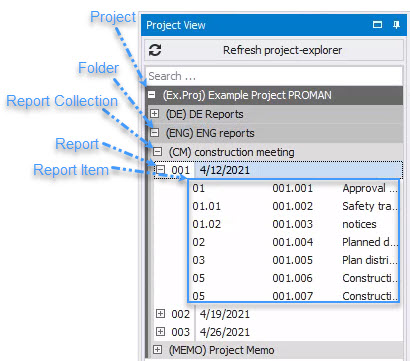
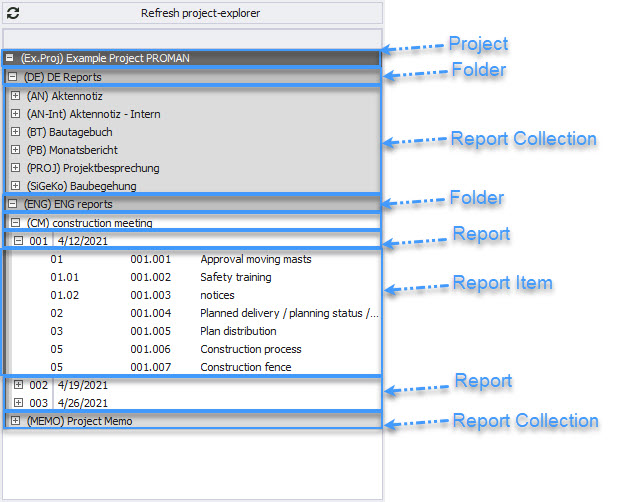
•You can create and manage various projects.
•Projects can contain different types of report collections.
•These report collections represent different meeting groups, such as construction meetings, client meetings, project meetings, Jour Fixe, and memos.
•In the report collections, individual reports that represent meetings, as well as the meeting points contained within them, are recorded.
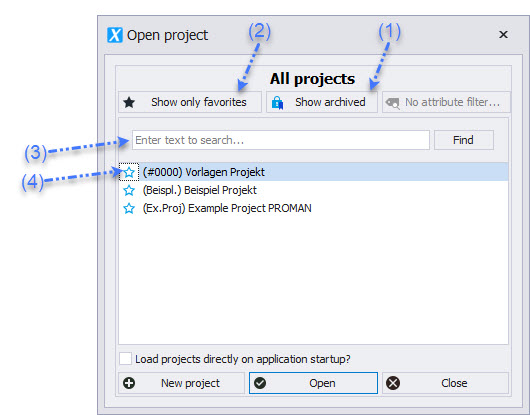
When PROMAN X starts, the "Open Project" dialog appears.
Double-click to open a project.
You can search for a specific project in the search field (3).
Use the favorite star (4) to mark your most important projects. When a project is marked as a favorite, only favorites are displayed.
To display all projects again, use the "Show Only Favorites" button (2).
The "Show Decommissioned" option displays all decommissioned or archived projects (1).
The mask elements can be rearranged by drag and drop.
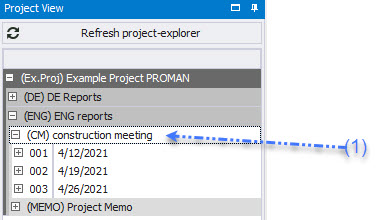
Click on the blue menu bar (1) of an element and place it in the position cross (2) that appears.
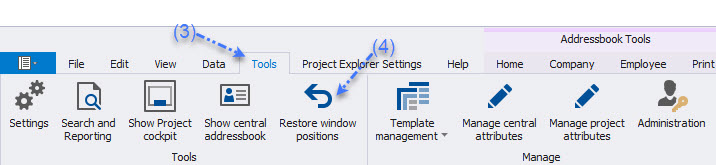
The arrangement can be reset at any time. To do this, click on Tools (3) in the menu bar and select "Reset Window Positions" (4).
Project tree with report collections and their reports (1)
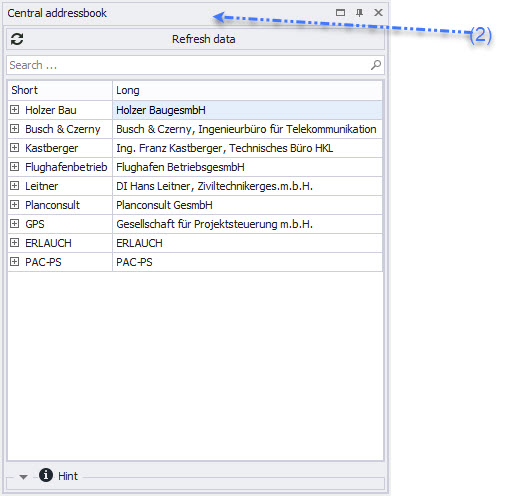
Address data (central or project-specific, recognizable by the header) (2)
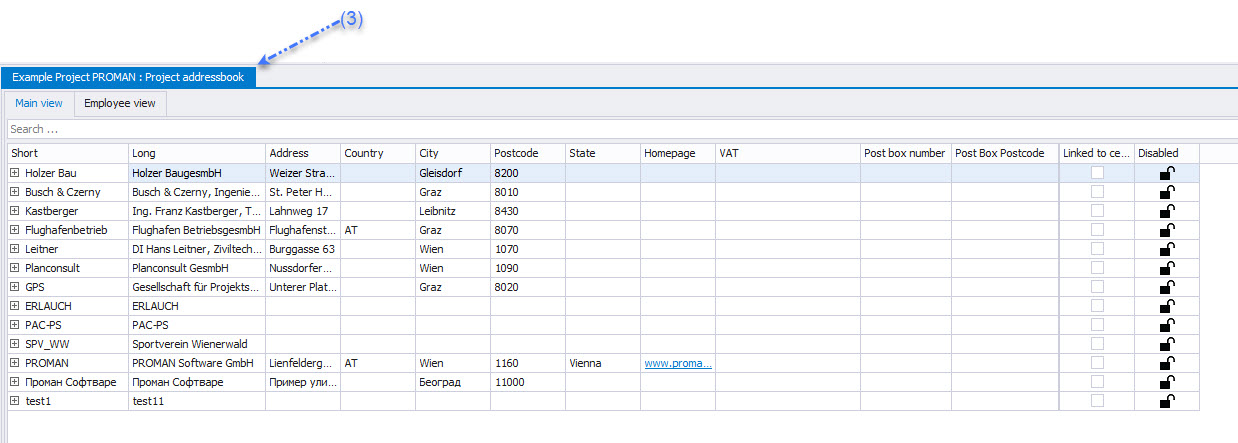
Project addresses (3)
A menu bar with the essential functions for the current view (4)
Menus and functions can be selected in the following ways:
Right-click (1).
Top menu elements (2).
In the Project Assistant, additional options are available:
Adopt project structure/templates from the template project (1): This option transfers all settings and the structure from the template project.
Import project data (2): This option takes you directly to the "Project Templates" screen to import data (such as logos, report collections, chapters, texts, etc.) from existing projects. (see 2.3 Project Template)
In the 'Edit Project Details' screen (3), you have the option to manually enter and edit all project details, such as logo, description, and project code. This occurs after the project is created and without adopting templates.
"Manage Project" can be opened in the following ways:
Via the menu bar (1).
By right-clicking in the Project Explorer (2).
In the "Manage Project" area, the master data can also be edited later.
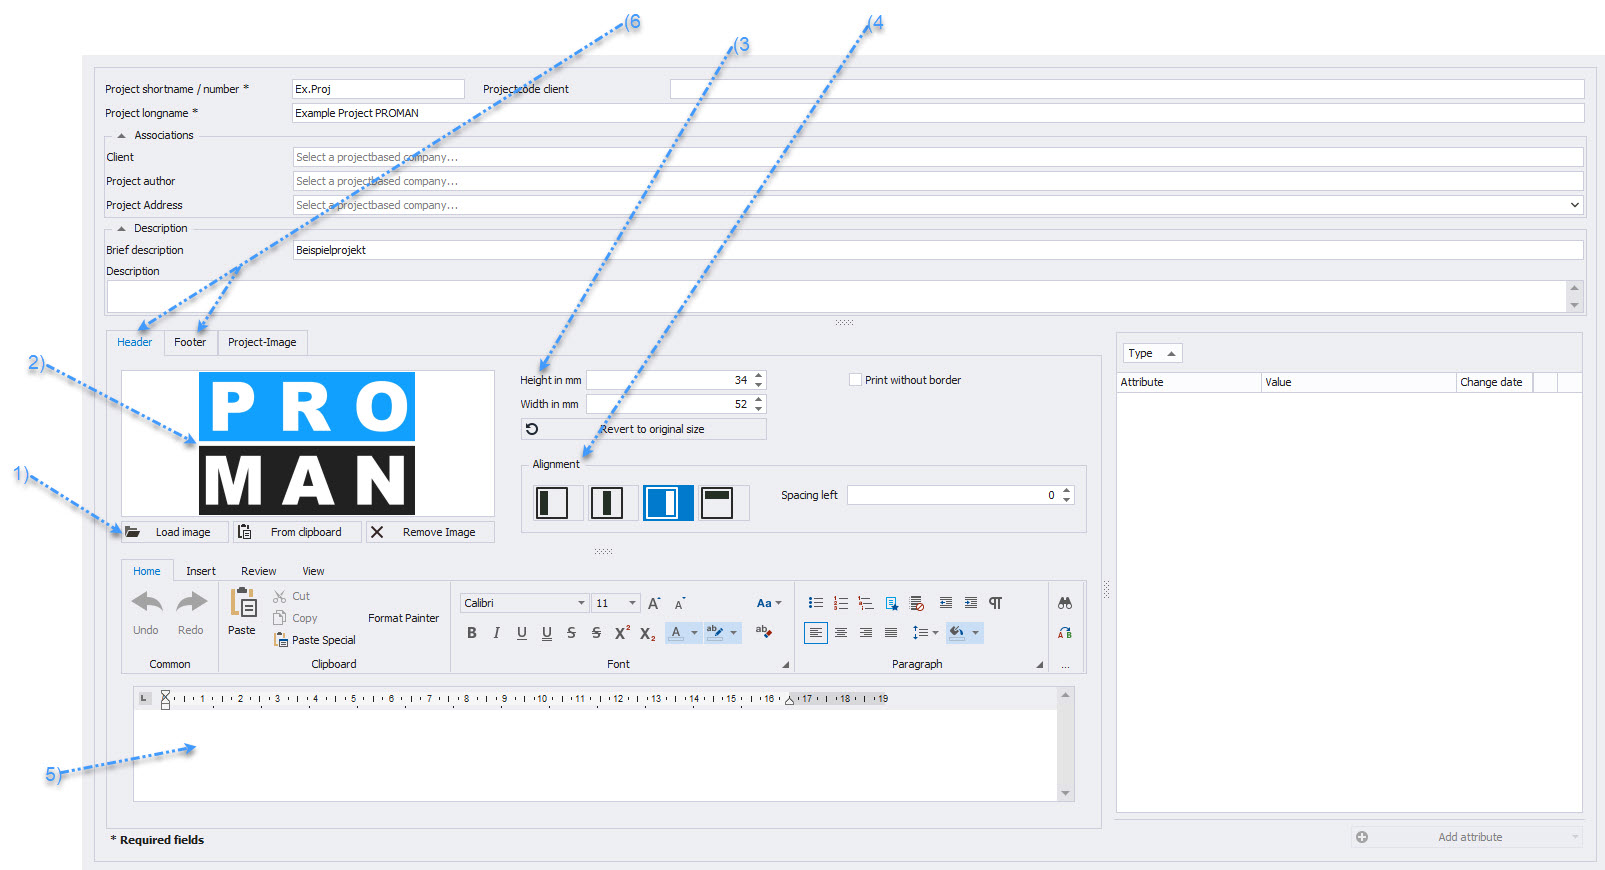
In the "Manage Project" area (2.1 Project Master Data in Print), a project logo as well as a header and footer can also be adjusted.
Use "Load Image" (1) to insert a logo, which will then be displayed in the preview (2).
The width and height (3) as well as the alignment (4) of the logo can be adjusted for printing.
The header and footer (6) are adjusted in the text editor (5).
To quickly customize a project, templates from any project can be adopted.
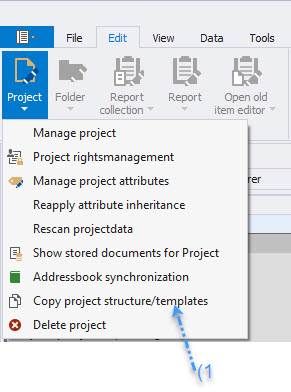
This can be done directly when creating the project or for an existing project via the menu bar "Adopt Project Structure/Templates" (1) or by right-clicking in the Project Explorer (2).
In the menu (1), select a project from which the templates should be imported.
Use the copy buttons (2) to adopt individual elements.
In the toolbox (3), many other templates are available, such as project addresses, attributes, and functions that can be imported.
The "Quick Selection" button (4) allows you to quickly adopt all structural data or all structural data without project participants.
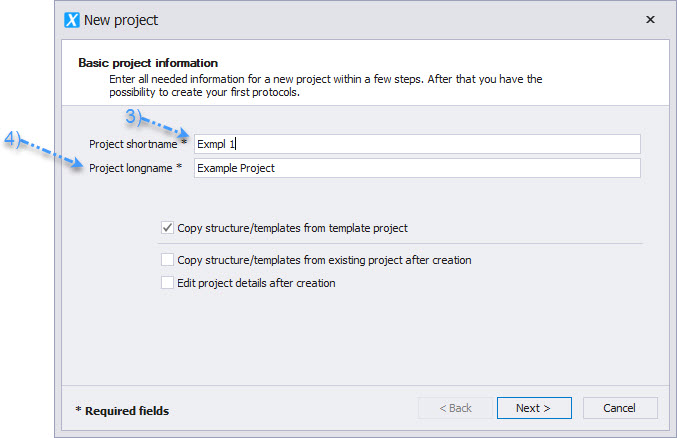
In the menu bar under "File" → "New" (1), you can create a new project (2).
Project Short Form: This represents a unique key for the project, e.g., an accounting number (3)
Project Long Form: This is where the actual project name is entered (4)
In the Project Explorer, you can edit chapters of a report collection as follows:
When you are in the protocol, you can edit chapters as follows:
Already existing chapters can be edited as follows:
(1) Select the desired chapter in the menu.
(2) Adjust the selected chapter as needed.
(3) If necessary, you can also delete the chapter.
The arrangement of chapters and the structuring into chapters and subchapters can be done either by drag-and-drop or via the chapter submenu with a right-click (4).
The print settings of a report collection can be easily adopted from another collection:
In the right area of the report collection, you can select a report collection (2) from a project (1) whose settings you want to adopt.
With the option "Adopt and Save Settings" (3), all print settings of the selected report collection are applied.
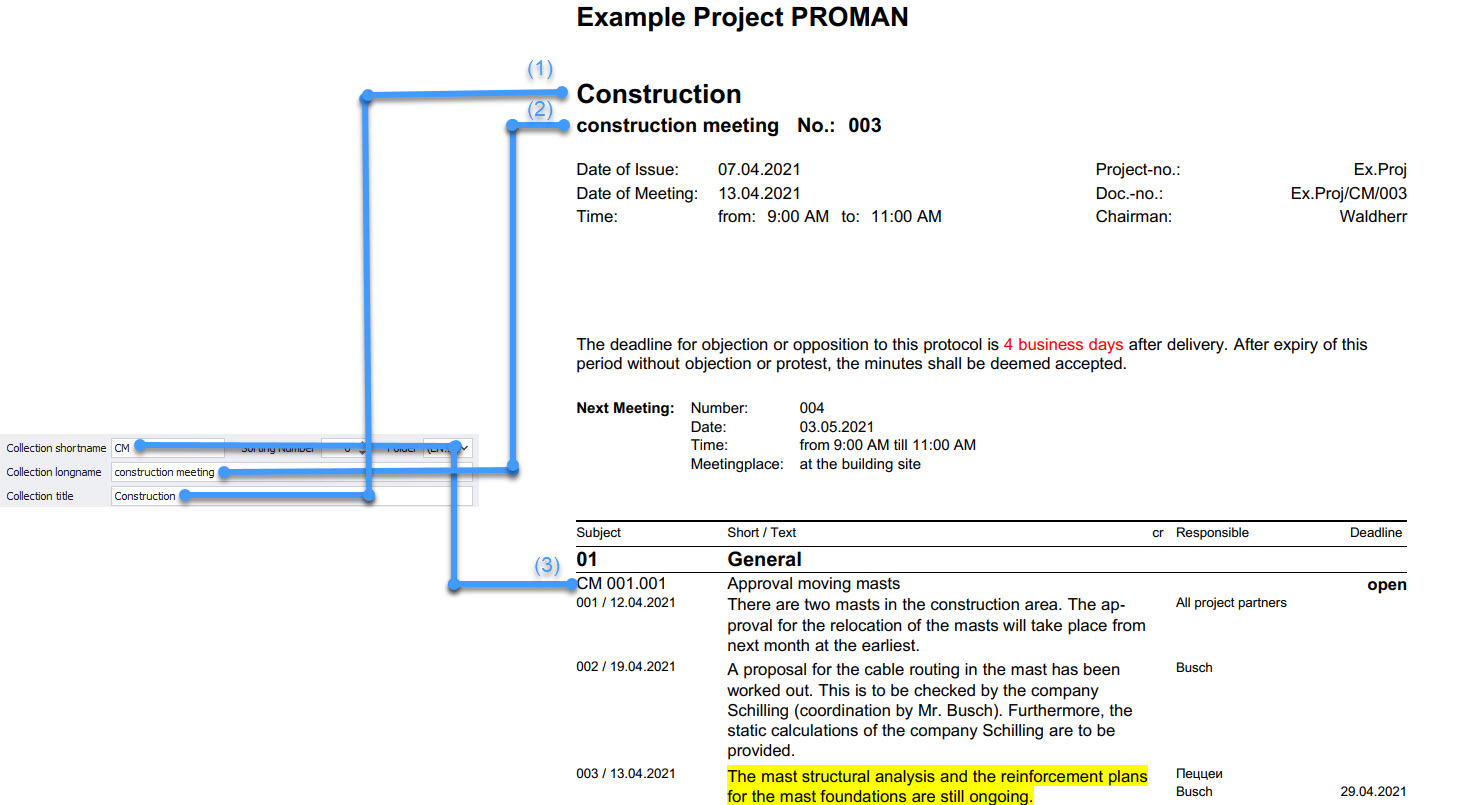
The report collection serves as a repository for all reports related to a specific topic.
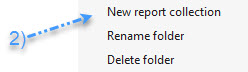
To create a new report collection:
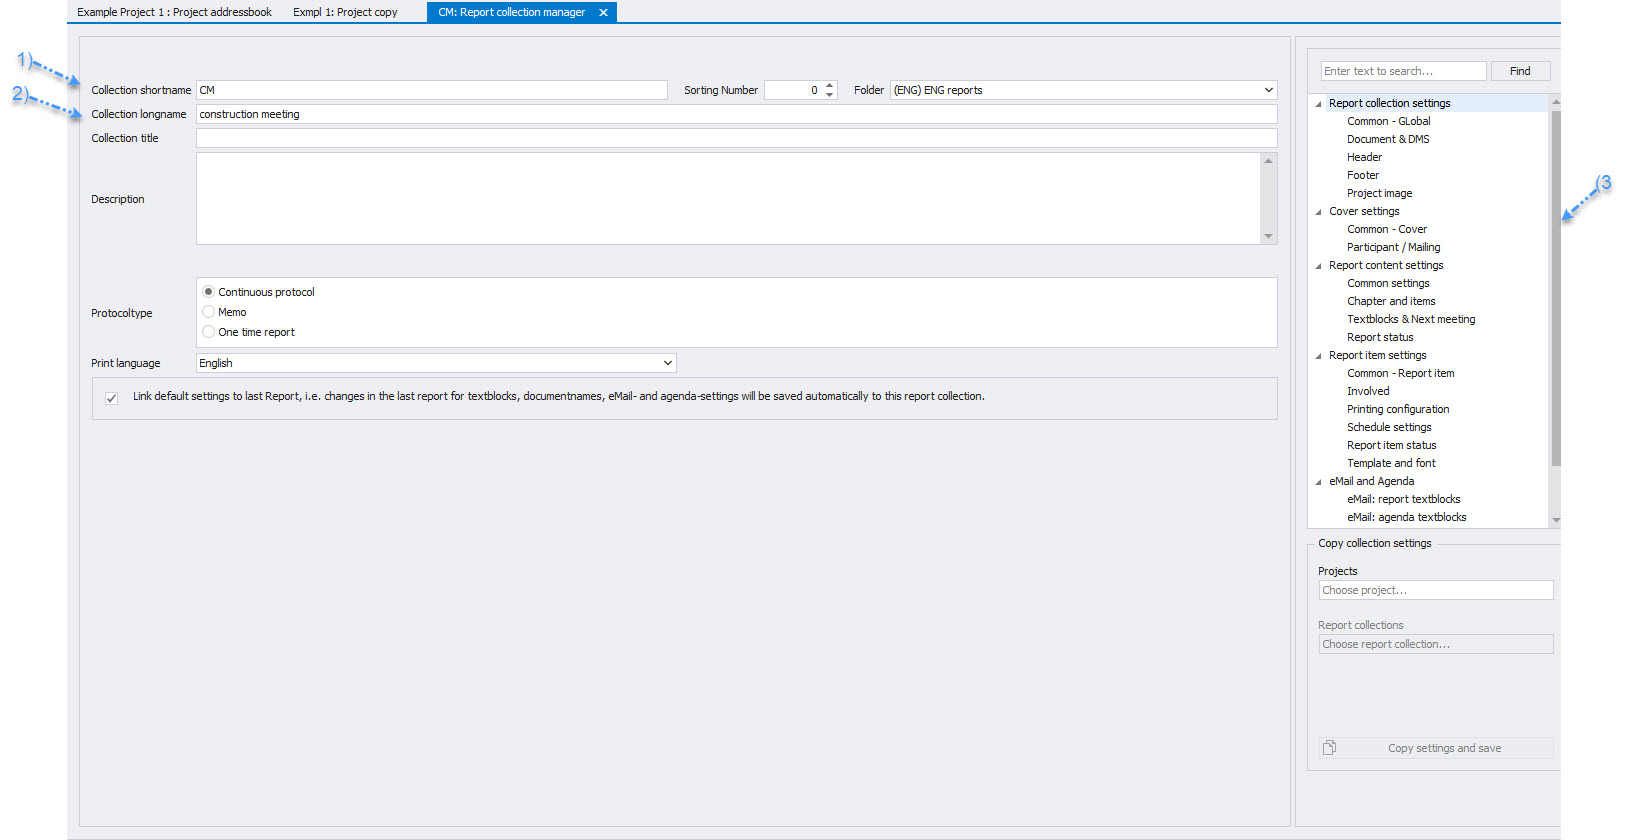
In the Report Collection Manager, you can manage your report collections:
When managing the report collection in the Report Collection Circle, the following points are important:
(1) Collection Short Form: Enter a unique identification number (ID) for the circle.
(2) Collection Long Form: This field displays the name of the collection as it appears in the program.
The print settings for the report collection can be found in section 3.
(More information 5.1 Copy Report Collection Print Settings)
Document path for output (optional, only for local PromanX application):
This path serves as the default for PDF output. It is suggested when saving protocols in PDF format.
On the right side of the Report Collection Manager (1), you can set the desired document path (2).
If fields are not filled in, the subsequent fields automatically move up. For example, if the "Leader" field is not filled, the "Author" shifts to the top line.
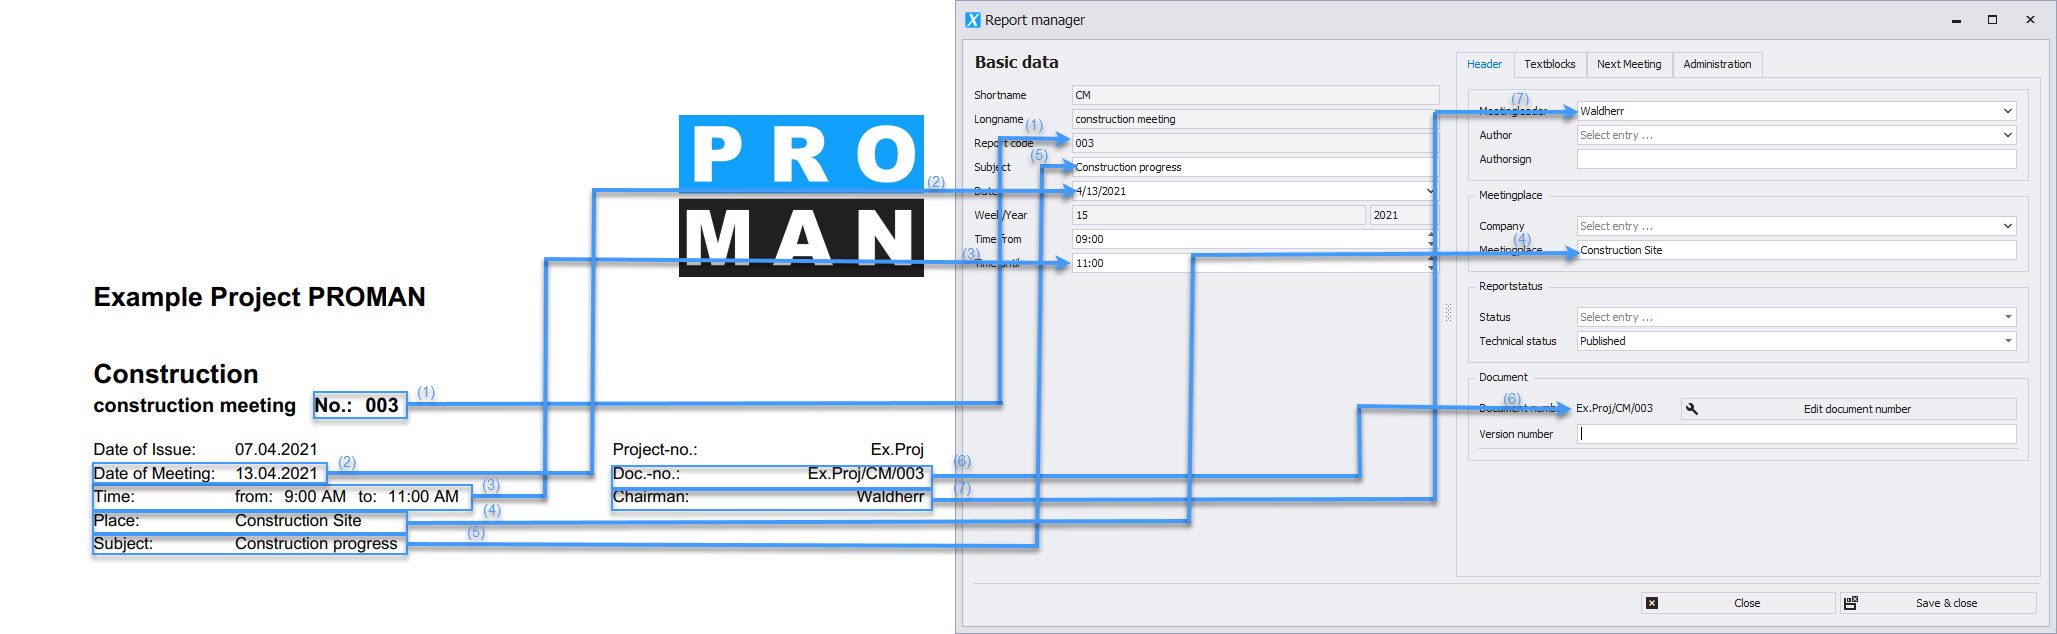
In the "Paragraphs" tab, you can insert your text paragraphs at various positions in the protocol. These paragraphs are automatically carried over from one protocol to the next.
List of text paragraphs available in the project (1)
These can be dragged and dropped to the desired position in the report (2)
Editing is done via the menu item "Edit Text Paragraphs Templates" (3)
The text paragraph to be edited is selected (1), edited in the editor, and saved (2).
To create a new text paragraph, select the "New Text Paragraph Template" button (3), choose the name for the template (4), the section where the template will be used (5), adjust the content in the editor, and then click save (2).
Under the "Next Meeting" tab, you can enter your next meeting details.
Required fields: none
Optional important fields:
Date (1)
Time (2)
Location of the next meeting (3)
Display in the report:
On the cover page
At the end of the report
Do not display
If you wish to customize the formatting and content, you can select a text block under the print template.
By right-clicking on the report collection, you can create a report using the "New Report" button (1).
If reports already exist, a new report will be created that is chronologically based on the last report.
To access the "Manage Report" screen later, select the report in the Project Explorer and right-click to choose the "Edit Report" button (2).
All fields are optional. However, if filled in, they will appear in the printout.
Subject, date, time.
In the Header Data tab: Leader, author, and location information.
When creating a new report, all open items from the previous report are automatically carried over.
No items are lost; the agenda is automatically created for you.
A report status (1), such as "Draft," can be set and included in the printout (2).
Reports are a central part of documentation in PROMAN and are systematically organized into report collections.
Each report documents specific meeting results, progress, or decisions within a project. There are two simple methods to create a new report:
By right-clicking on the report collection, you can create a report with the "New Report" button (1)
Alternatively, you can also use the functions via the top menu bar:
Click on the desired report collection and then select "File" → "New" → "Report".
The distribution list defines the participants who attended this meeting.
Desired project participants can be easily dragged and dropped from the project address book into the participant list (1).
Entries can be removed using X (2).
Manual sorting (3) allows you to place them in the desired position (Right-click).
The columns of the participant list are defined in the layout and can be modified (For simple layout optimization, please contact our support).
In the comments, you can enter your notes to prepare for the next meeting. This is done via the Report Editor (1).
Comments are not printed in the protocol.
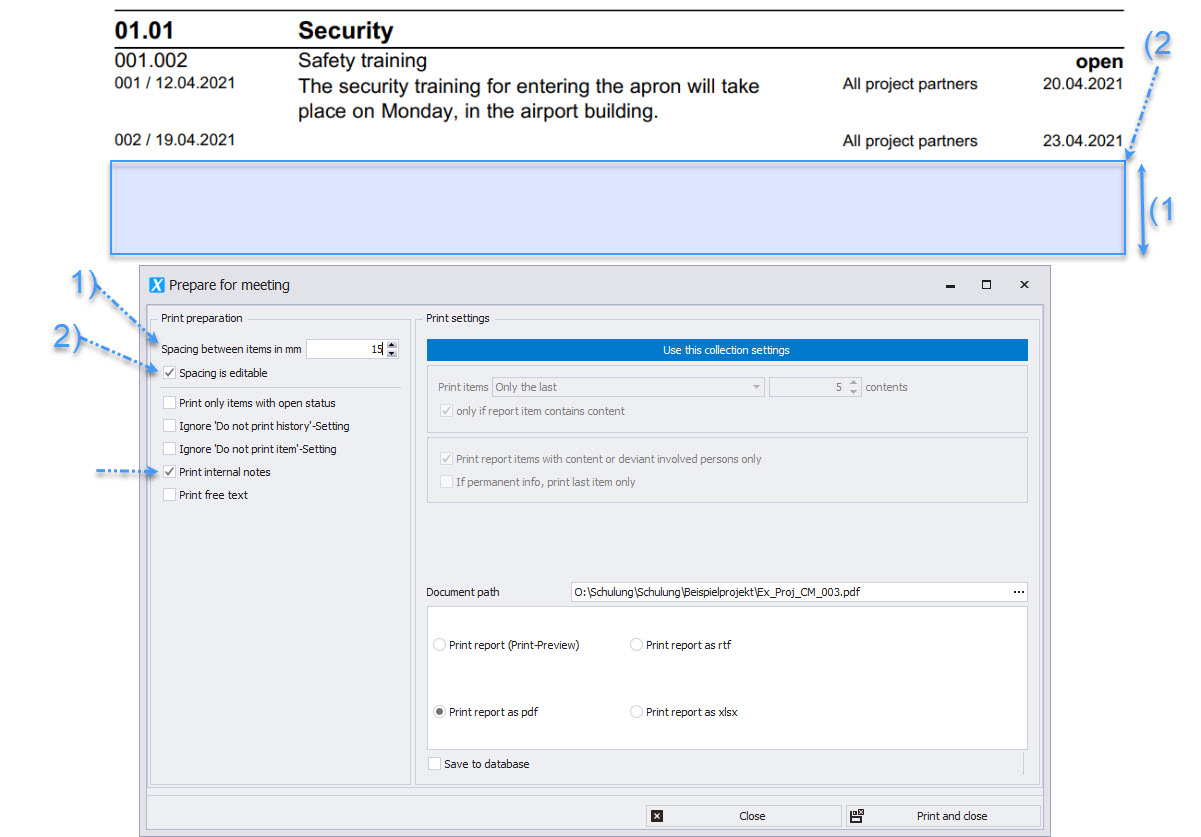
Comments can be printed in the “Prepare Meeting” section (3).
“Prepare Meeting” allows you to create your own notes for preparation and to take along for the next meeting.
Space for handwritten notes (1).
Click on Manage Participants (1) in the report protocol toolbox or right-click on the desired report (2) and then select Manage Participants (3) to edit the advanced settings for participants/distribution list.
Managing participants consists of three areas:
Project Address Book (1): Drag participants into your distribution list as you did in the protocol view and define their attendance (2).
Through the toolbox, you can adopt the sorting defined in the project address book (3) (Chapter 4.2) and add affected individuals from Report Items into the distribution list (4).
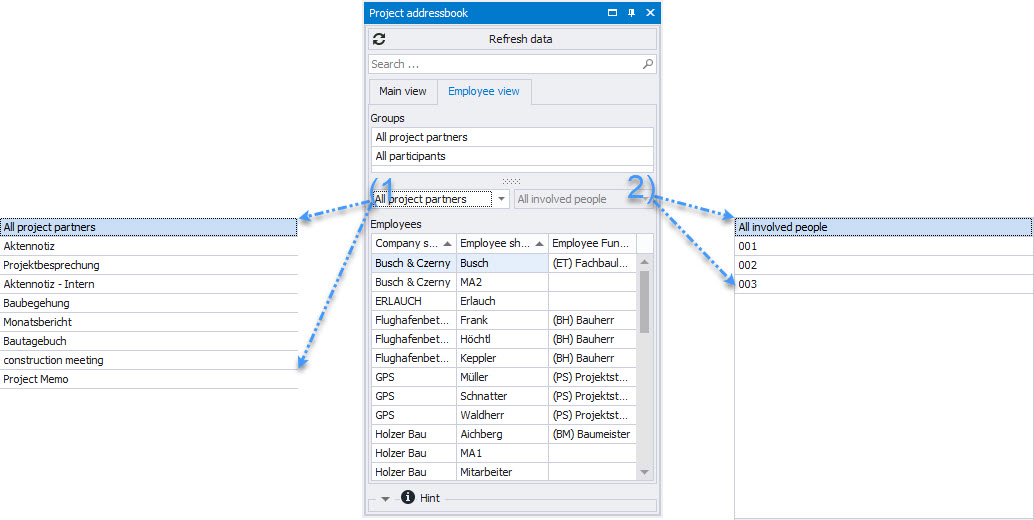
The project address book can also be filtered by participant/distribution lists.
Main view: Project partners grouped by company.
Employee view: Shows all project partners.
Filter by all project partners or a specific meeting group (1).
Further filtering can be done by filtering for a specific report (2), e.g., all participants of the previous meeting.
You can also directly find the desired company/person in the search field.
Distribution: Defines the document's distribution group. It is also used for automatic email distribution of the protocol (1).
Attendance can be added with "Partially Present" and time or replaced by "Excused" (2).
To print these, an appropriate print template must be set (For simple layout optimization, please contact our support).
Sorting can be changed via drag & drop.
All participants in the standard distribution list are automatically carried over to the next meeting (3).
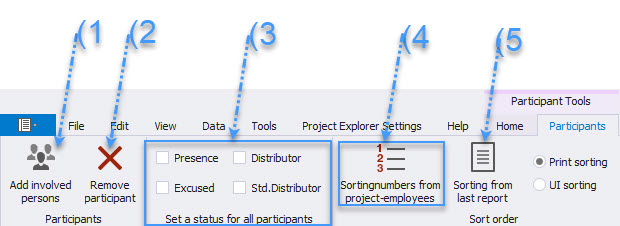
The following actions are simplified in the menu bar:
Affected project partners, e.g., those entered as responsible for a point, can be added to the distribution list (1).
Remove selected participants (2).
The status for all participants can be defined with one click (3).
Adopt sorting from the project address book (4).
Adopt sorting from the last report (5).
After a report is created, the protocol view automatically opens. To reopen the protocol view of a report at a later time, you have two options:
You can either directly access the desired report by double-clicking in the Project Explorer
or select the report and activate the appropriate option in the menu selection by right-clicking.
The protocol view allows you to preview the protocol and edit all essential information.
This view largely corresponds to the printout.
In the protocol view, most fields can be directly selected (1) and edited (2)
Project participants can be easily dragged from the project address book into the protocol, e.g., responsible persons for a point or participants/distribution list (1)
Control information is highlighted in blue (2) (see Radial Menu)
X to remove the person on the TV.
Under "Load Report Items" (2), report items from previous meetings can be reintroduced into the most recent report (1).
For example, in a previous meeting, the report item was marked as completed and was therefore not carried over to the next meeting. Now, the report item should be reintroduced in the current meeting for further processing.
Open report items, also referred to as ongoing report items, contain entries from the respective report in which they were created. For each report, open report items automatically receive an entry that records the report's date. This practice ensures that the history of the handling and discussion of a report item remains transparent and traceable over time. Open report items serve as a continuous reminder of tasks yet to be completed or unresolved questions that may be clarified over multiple meetings. By adding the date of each report in which the report item is addressed, project participants gain a clear overview of the development and progress of individual report items.
Entry 001 from the first report, Entry 002 from the second report, and Entry 003 from the third report illustrate how open report items are carried forward across multiple reports.
Each report receives an entry for these report items with the specific date of the respective report, enabling a seamless documentation and tracking of open tasks and discussion points. This continuous continuation and date notation not only support the transparency and clarity of project progress but also the effective handling and completion control of the listed report items.
To change the report item number of an already created report item, navigate to the corresponding report in the Project Explorer. Right-click on the report where the report item was created and select the option "Edit Report Item Number" (1).
In the "Change Report Item Number" window that opens, you can adjust the report item number as needed.
This window displays all report items created in the selected report. You have the option to adjust the number of a report item, for example, from 003.006 to 003.008.
With the image editor in PROMAN, you can edit images directly within the protocol. To open the image editor, click on the desired image with the left mouse button and select "Image Editor" from the context menu.
In the image editor, you have the option to add text, crop images, or insert special markings such as stickers for plans to make your documentation more informative.
Attachments can be integrated into the report in various ways:
Drag and drop the attachment directly into the desired report item in the Report Editor (1). To remove the attachment, use the corresponding option (2).
Copy the attachment from Windows Explorer to the clipboard (3) and paste it into a specific report item using the paste icon (3).
Note: The drag-and-drop functionality for attachments is only available when PROMAN is installed locally on a computer. The drag-and-drop feature is not possible via a remote desktop connection (Drag & Drop in Proman: Instructions).
PDF attachments are directly included when printing the report and marked with the corresponding report item number.
Excel files, on the other hand, are automatically added as attachments when the report is sent via email.
Images and attachments can be integrated into your report in various ways:
Insert images into the protocol: Drag and drop images directly into the protocol, where they can be adjusted with a control bar (1). Decide whether images should be printed (2) or edited using the image editor, such as adding cropping or markers (3). You can choose to position images before or after the report item content (4) and remove the image if needed (5).
Add PDF attachments: Enhance report items by dragging PDF attachments into the desired report item (6). These PDFs will be printed along with the report and will be marked with the corresponding report item number.
Note: Drag and drop of attachments is only possible when PROMAN is installed locally on a computer. This function is not available when working via a remote desktop connection (Drag & Drop in Proman: Instructions)
In the protocol view, clicking on the current report item status (1) opens a list of various status types (2). This status list can be customized in the Report Collection Manager under "Report Item Settings / Status" to optimize the management and tracking of report items within the report.
The available status types include:
Info-Standard: This status is printed only in the current report.
Ongoing Info: Applies to all reports until the report item is completed.
Open: Marks items that still require processing.
In Progress: Indicates that work is ongoing on the report item.
Completed (on): Marks the completion date of a report item.
Cancelled: For items that are no longer being pursued.
Deferred Until / Reminder: Items that should be revisited at a later date. With the reminder function, the item is printed once in the current report and then hidden until the specified date.
**Custom S
A report item corresponds to a task/information in a meeting.
Report items can also be created and edited via the Project Explorer.
Right-click on the report (1) to create a report item within the report. Right-click on the report item (2) to edit it.
Existing report items can also be opened and edited in the protocol view (3).
Required Fields
Report Item Short Form: Keyword / Title (1)
Report Item Status (2)
Optional
Images (3)
Attachments (4)
Affected parties (5)
The display names of the affected parties can be defined in the print settings of the report collection:
As entered in the report item
Person / Company / Function
Short Form / Long Form
Note: The print space is limited, so avoid printing too much information, e.g., Company & Person & Function in long form is not possible.
Here, the number of historical report items to be printed can be set. This number cannot exceed the generally defined standard value. The number of printed historical report items can be defined in the circle.
In the Report Item Editor, images from Windows Explorer can be dragged and dropped into the respective image fields.
They can be placed either before or after the text.
Additional settings can be made via “Manage Images” (1).
Images are automatically stored in the database and reduced to achieve optimal storage size & quality. Image Editor
Change the image name (1).
Adjust image width in print (2):
As text block
From text to right margin
Full page width
Delete or save the selected image (3).
Add more images from Explorer or clipboard (4).
Two images can be displayed side by side; additional images are arranged below.
Images can be freely positioned via drag & drop.
Open the image editor for a selected image (5) (alternatively, double-click the image).
In the image editor (1), you can quickly and easily adjust your photos and plans:
Crop image (2)
Add text and annotations like arrows (3)
Place markers (4) via drag & drop, e.g., on plans
Undo all changes (5)
This allows you to visually highlight relevant image excerpts, plans, real recordings, positions, defects, before-and-after states, and much more directly in the protocol.
In the Report Item Editor, you can manage attachments using the “Manage Attachments” button in the toolbox (1).
Double-click (2) on a selected attachment or the Edit button (3) to open the "Edit Attachment" menu (4).
The attachment can optionally be saved in the database (5).
This version of the document is saved unchanged in the meeting report!
Protocol sorting allows you to freely sort report items within a chapter in the protocol or easily move them to another chapter.
To open protocol sorting, navigate in the top menu bar under "Protocol Tools" in "Protocol Management" to "Protocol Sorting."
In the dropdown menu of protocol sorting, you have three options:
By Report Item Number: This function allows you to subsequently assign a report item to the desired chapter through chapter sorting.
By Chapter: Here, you can move report items to another chapter using drag and drop.
Free Sorting within a Chapter: Here, you can freely sort report items within a chapter using drag and drop.
The comment function in PROMAN allows internal communication and feedback directly within the report without appearing in the printout.
Users, regardless of their permissions, can leave comments on report items, enabling interaction within the team even for read-only access.
A comment overview simplifies access to all discussions and feedback on report items, optimizing internal communication and ensuring that all relevant information is considered without appearing in the final document.
Through the radial menu directly on the report item, you can select the "Comments" option to open and leave comments on this specific report item.
In our example, User1 leaves a comment on report item 001.002.
User2 opens PROMAN and the same report. He receives a notification with an exclamation mark (!) in the top menu bar, indicating that unread comments are present in the report.
From here, you can directly navigate to the new comment or open the comment overview.
Next to the report item, User1 also sees a comment icon, notifying him that a comment has been left.
The comment overview shows the entire communication exchange between User1 and User2.
You can also add images or PDF attachments to the comment. This leaves an image and attachment icon.
A subreport item can be created by selecting the "New" option in the report item radial menu (right-click on a report item) and then choosing "New Subreport Item for this Report Item."
You can add subreport items to each main report item.
Subreport items are directly associated with a main report item and follow a specific numbering logic that combines the main report item number with a sequential letter. For example, if the main report item is numbered 001.003, the first subreport item will be labeled as 001.003.a, the next as 001.003.b, and this sequence continues for further subreport items.
The status of subreport items can be set independently of the main report item. This means that a main report item can remain "open," while individual subreport items can be marked as "completed."
If you set the main report item to "completed," all associated subreport items will automatically be marked as "completed" as well.
The report item number is a sequential identifier within a report and is unique for each report collection.
It consists of the report number (1) and the report item code (2), allowing for clear assignment and tracking of meeting items.
In the protocol view, you can edit report items directly below the cover page. Our example shows existing chapters adopted from the sample project (see chapter "Create").
Editing a report item short form (report item title) (1) or report item content (2) is done simply by left-clicking.
The status determines whether a report item is carried over to the next report. An open task, as indicated in the description next to the status, is transferred to the following report.
A completed task, however, still appears in the current protocol but is not included in the next one. This way, your protocol organizes itself, and you don't have to manually delete completed items.
Responsible persons can be assigned by dragging the desired employee from the project address book into the report item.
The Central Address Book (1) allows for the cross-project storage of companies and their employees.
Required companies and employees can be easily dragged and dropped into the project address book.
The project address book is used for the following areas:
Participants and distribution lists of meetings
Affected / responsible parties for report items
Automatic sending of reports via email
In the central address book, you can manage all companies and employees to assign them to the desired projects in the next step.
Settings made here apply globally to all projects where these contacts are used.
The search bar (1) allows you to quickly filter employees and companies:
The address book is customized using the different sections of the menu bar:
Create, edit, delete companies and their functions (1)
Create, edit, delete employees and their functions, copy employees to another company. This does not delete the existing record (2)
Management of attributes that can be assigned to companies, employees, and report items (3)
Import / Export of the address book, synchronization with Outlook, SQL, etc. (4)
With the button “Show decommissioned data” (1) you can choose whether decommissioned records should be displayed. If the button is blue, the display of decommissioned data is enabled.
The Custom Filter (2) allows you to optimize your search and display filtered address lists using a variety of filter criteria in addition to the classic search (3).
With the "Create Company" button in the toolbox, a new company is added.
A company logo can be added via drag and drop (1)* (Drag & Drop in Proman: Instructions) or by right-clicking in the menu with "Paste" / "Load" (4)/(3). Supported formats: jpg, gif, or png.
After creating the company, employees can be imported from Outlook using the .vcf file (5).
The company name (2) is a required field, and the company short form is unique and can only be assigned once, e.g., PROMAN for PROMAN Software.
Address information (1) is optional. If a company is selected under "Subsidiary of" (2), it will be listed in the printout.
Departments with short and long forms. Use "Add" (3) to assign a department. The department will appear for selection with the associated employees.
Various attributes (4) can be assigned to a company. These are created in the toolbox using the "Manage Attributes" button (06. Attributes).
The phone number (1) and email address (2) defined as "Is Standard" (3) are displayed in the printout.
Different functions can be added to the company via the dropdown menu (4). Under Manage Functions (5), more functions with short and long forms (6) can be added (7).
Click "Save & Close" to apply the entries and save the company.
Contacts can be imported from Outlook via drag and drop* (Drag & Drop in Proman: Instructions). Contacts can be imported from a vCard (3).
Images can be assigned to the employee via drag and drop* (Drag & Drop in Proman: Instructions) or by right-clicking through the menu (4).
Name Short Form – the short form must be unique and can only be assigned once (5).
Gender / Salutation (6) can be displayed on the cover page in the distribution list and in report items for responsible persons.
Title can be used for the long form (7). This can be displayed in the distribution list and for responsible persons.
* Drag & Drop is technically not possible via a remote desktop connection. Please use the clipboard and a .vcf file instead of the drag and drop function. (Drag & Drop in Proman: Instructions)
Departments previously created for the associated company can be selected here via the dropdown menu (1).
Functions (3) can be assigned to the employee via the dropdown menu (2). Under Manage Functions (4), new functions with short and long forms (6) can be added with the "New Function" button (5) (7).
Attributes can be assigned to an employee (1). For creating employee attributes, see Chapter 6 Attributes.
Phone number (2) & email (3) are used for automatic email sending via the local email client (Outlook, Lotus Notes, etc.). The phone number entered for the company is pre-filled for the employee and can be quickly adapted. From the first and last name, the address management automatically suggests email addresses in combination with the entered company email address.
Click Save & Close (4) to apply the entries.
The short form allows for space-saving printing of company and person names. Even external companies or individuals can recognize who or what it refers to based on the short form.
Examples:
Name: Roland Pezzei, Short Form: Pezzei
Company: PROMAN Software GmbH, Short Form: PROMAN
Functions are often used to represent the roles and responsibilities of companies and employees.
Creating (1) and editing functions is easy from both the central and project address management.
Functions also enable targeted search and analysis:
Open tasks, such as those of an electrician, can be found.
Functions are created in both short and long forms (2).
Through functions, each person in the project can be assigned a specific role.
Functions can be decommissioned (3) and hidden or displayed (4).
Functions can be exported as an Excel file (1).
To import functions (2), select the appropriate file (3), specify the columns for short and long forms (4), and then start the import (5).
If decommissioned functions are hidden, they will not appear in the export (6).
The import and export of functions can be done centrally or project-specific. Attributes in the project address book can be copied from other projects (7).
Attributes can be created for employees, companies, and report items either on a project-specific basis or centrally through Menu > Tools. In the create/edit forms for companies/employees, you can directly assign these attributes.
Select “New Attribute” to open the form where you can create your attributes (1).
Set the desired Short and Long Form (2).
You can create different Types of Attributes: List, Editable List, Integer, Yes/No, etc. (2).
It can be defined whether the attribute can be assigned to companies and/or employees. Accordingly, the attribute will appear in the creation and editing forms for companies and employees (3).
Confirm your entries by clicking “Add” (4).
The values of attributes of the types List, Editable List, and List of Key/Value Pairs can be imported and exported via Excel.
Import (1): Select the file to be imported (2). Define the column for Short and Long Form (3) and import the data (4).
Export (5): When you click on Export, your Explorer will open. After selecting the storage location, an Excel file with the attributes will be saved.
This is possible both centrally and project-specific.
Attributes can be copied from other projects into the project address book (6).
If you hide decommissioned attributes, they will not be displayed during export (7).
Using drag and drop or the “Copy Employee” function in the menu, you can copy employees to another company. The duplicated record is not deleted in the process.
Drag the employee to be copied from the central or project-specific address management into the “Copy data from:” field (1).
Then, add the target company by dragging it into the “Copy to:” field (2).
Click on “Execute Copy” (3) to start the prompt asking which data should be copied (4).
Confirm your entry with “OK” (5).
The Filter Panel (1) provides a custom filter both centrally and in specific projects. This allows you to refine your search using additional criteria such as postal code, attribute, or department and export the search results.
Select your desired search criteria.
Click on “Start Custom Search” to begin the search process (2).
If you have selected multiple criteria within a category, such as the company, you can use the “Any Filter Applies” option (3) to specify whether all or only one of the criteria should be relevant for the search results.
In the central address book, addresses can be imported or exported via Excel.
For Import, select the desired source file using “Open File” (4).
The corresponding Excel column name can be selected for each field (5).
For company and employee phone numbers, email addresses, and company functions, required fields can be added, and the type can be selected (6).
Click “Import” to execute the import process (7).
In the Central Address Book, an import or synchronization with external programs can be performed.
Go to the synchronization settings through Menu → Tools → Settings (1).
Synchronization options:
From Coor to Proman
From Outlook to Proman
From Access to Proman
SQL to Proman
Please note that synchronization with Proman is only possible if the program is installed locally on your computer. For additional synchronization options with the cloud, please contact our support team.
Addresses are needed for:
Participant list on the cover page (1)
Responsibility in report items - responsible persons (2)
Main responsible persons (3)
Project and protocol leader and author (4)
Employees and companies can be transferred from the Central Address Book to the Project Address Book in two ways:
(1) By right-clicking and selecting "Add to Project," you can directly copy the desired entries into the Project Address Book.
(2) Alternatively, you can drag and drop the entries into the Project Address Book.
The companies and employees transferred from the Central Address Book to your project will be displayed with some specific characteristics:
These entries appear grayed out, except for the attributes and the "Subsidiary of" information, and are marked with checkboxes (1). This indicates that they are standard information from the Central Address Book.
You can uncheck these boxes (2) to make project-specific adjustments to the data. Changes made in this way apply only to the current project.
The "Switch to Central" button (3) allows you to make direct changes in the Central Address Book if necessary.
In the Project Address Book, the order of project partners can be set via the menu bar under "Address Book Tools." Use the "Edit Sorting" button (1) for this purpose.
The sorting made in the Project Address Book applies to the entire project, including the participant lists:
By clicking on a column name, you can adjust the sorting either ascending or descending (2).
The sorting number can be manually edited to create a custom order (3). Additionally, employees can be moved to the desired position in the list using drag and drop. If needed, you can reset the sorting to the default order at any time. There is also the option to override the sorting directly in the report.
Within the report items and distribution lists of a project, you can replace an employee with another project-specific employee. This replacement affects the entire project, including all participant lists and the responsible persons for individual report items.
To replace an employee, proceed as follows:
Drag the employee to be replaced from the Project Address Book into the designated field (2).
Add the employee who will replace them (3).
Finally, click "Execute Replacement" to complete the process (4).
Employees who are no longer active in the project can be decommissioned within the project. This is done by clicking on the lock icon (1), which allows employees to be decommissioned and reactivated if needed.
The same lock icon (2) can be used to show and hide decommissioned employees.
This decommissioning function is also applicable to specific roles or functions within the project.
Company addresses can also be created only in the Project Address Book (1).
However, usually, all companies are created in the Central Address Book (2) (3.1 Central Address Management) and only added to individual projects as needed.
Addresses can also be transferred from the Project Address Book to the Central Address Book.
The following features are available in the project's address management:
Central Address Book with search function (1).
Project Address Book with search function (2).
Create and edit companies and employees and manage their functions (1).
Sort the order of project partners in the report (2).
Attributes for companies, employees, and report items (3).
Excel export & PDF export (4).
Employees can be copied and replaced project-specific. In both cases, the original file remains intact (5).
Decommissioned companies and employees can be shown or hidden on a project-specific basis (1).
The Custom Filter also allows you to refine your search with various criteria on a project-specific basis, in addition to the classic search, and display filtered address lists (2).
Enter the name for the short and long form of the attribute (1).
To assign an attribute to a report item, make sure it is of the type Key/Value Pair (2).
Enter the values for the Key/Value Pair and click "Add to List" to add the value (3).
Allow the attribute to be added to a report item by checking the appropriate checkbox (4).
Note that attributes can be printed in short and/or long form (5).
Create the attribute using the "Create Attribute" option (6).
Assigning attributes to report items is done via the radial menu:
Right-click on a report item, select “Report Item Data” (1), and then “Attributes” (2) to assign attributes to the selected report item.
In this screen, you can assign the previously created attributes to a report item.
Before doing this, you need to add the attributes that have already been created.
Attributes in PromanX are freely definable keywords used to organize information precisely and efficiently. They offer the following functions:
Individual Assignment: Attributes can be assigned to any report item within PromanX to highlight specific information or categories.
Optional Visibility in Print: You can choose whether these attributes appear in the printed report, which is useful for clearly conveying important information to the reader.
Facilitated Search: With attributes in PromanX, you can quickly and easily search for specific report items, such as all entries related to additional costs or a specific damage number.
Creation of Filtered Reports: They enable the creation of reports based on specific criteria, such as a list of decisions that relate only to certain attributes.
In the email sending screen, Proman offers the additional function to create filtered emails.
This function allows you to generate PDF documents that contain only the report items for which a specific responsible employee is assigned. This tailored option facilitates targeted communication and ensures that employees receive only the information relevant to them.
Checkboxes allow you to select the responsible employees for whom a specific PDF document should be created for email sending.
In our example, this results in three different PDF documents and three separate emails.
Each email contains only the report items assigned to the selected responsible employees. This functionality enables precise and effective distribution of relevant information to the responsible team members.
Proman reports can be printed in PDF, RTF, or XLS formats. Additionally, Proman offers the ability to generate an email directly within the system, which you can then send using your email client.
While the protocol view is open, you will find the “Print Report” option in the protocol tools in the top menu bar.
Select the desired format for printing—PDF, RTF, or XLSX—and choose the storage path for your document.
The document will be saved in the chosen path and automatically opened after the printing process.
In the email sending screen, Proman offers various options for effectively sending the report:
(1) Select the storage path for the PDF copy of your report. If permanent storage is not required, you can also store the PDF temporarily.
(2) Allows you to select free text and edit the content of your template.
(3) Customize the email subject line as needed.
Existing text block templates can be dragged and dropped into the email window for use in your message.
There are two options for sending your email:
(5) Send Directly allows immediate sending of the email, provided Proman is connected to your email client.
(6) Open Email displays the email in your email client for review before it is sent.
Open Reporting Tool
Start in PROMAN under "Tools > Search and Reporting." On the right side, the "Reporting Tool" will be displayed, where you can select "Filter Report Items."
Set Filters
In the reporting tool, you have the option to set various filters.
For example, the filter "Status" → "completed."
Start Reporting After setting the filters, click "Start Analyzing." PromanX will then report on all report items with the "completed" status in the current report.
PromanX reports on all report items with the status "completed" in the current report.
Include Historical Report Items To expand the reporting to include previous reports, the option "Search also in historical report items" should be enabled. PromanX will then include all previous reports in the search.
PromanX now extends the search to all previous reports:
Additional Filter Options Additional filtering options include:
Address Filter: Select companies or employees from the project address book (affected parties/responsible).
Keyword Filter: Enter relevant terms.
Attribute Filter: Select specific properties. (09. Attributes)
Print Reporting The entire reporting can be printed to create a physical document.
The documentation for the new cockpit can be found here.
The project-wide definition of the header and footer, including the project logo, is done according to section 02.3 Project Logo.
For specific requirements, such as integrating a client’s logo into documents for a particular meeting, the general settings can be customized via the print settings.
In the general settings for report items (1), the layout of the report item code can be customized (2). This flexibility allows you to format the report item code according to your documentation requirements, for example, by using different representations of the circle or chapter short description. Customizing the report item code contributes to a clearer structure and easier navigation within your reports.
Report Collection Short Description:
Chapter Short Form:
For optimized documentation and presentation of your reports, PROMAN allows individual settings regarding the content and structure of your documents, as illustrated below:
Report Content Settings / Chapters & Report Items (1)
Print Table of Contents for All Chapters (2): Provides a complete overview of the chapter structure at the beginning of the report.
The table of contents appears only in print, not in the digital protocol view, offering a clear overview for printed documents.
Print Chapters Without Report Items (3): Chapters without specific sub-items are also included for a complete representation.
Print Chapters on a New Page (4): For clear organization, each chapter begins on a new page, except for subchapters.
These settings support customized report creation that seamlessly integrates into the overall structure of your project documentation process, maintaining clarity and improving readability.
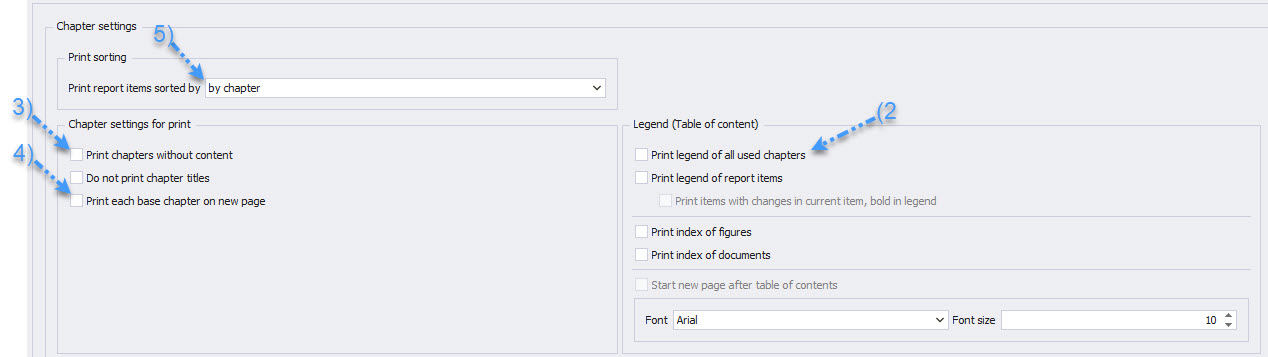
Sorting of Report Items by Report Item Number or by Chapter (5): Offers flexibility in arranging content, either sequentially by numbering or grouped by chapters.
Note: When sorting by report item number, the chapters are not printed.
By Report Item Number:
By Chapter:
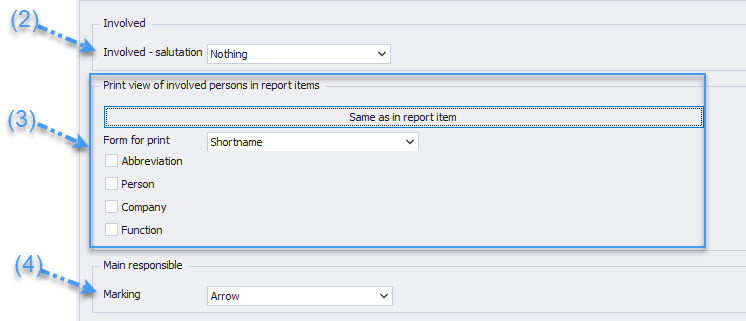
In the settings for Affected Parties and Responsible Persons (1), you can precisely define how these individuals are represented in your reports.
You have the option to customize the salutation of the responsible persons (2) and decide whether the representation should emphasize the person, the company, or their function (3).
For the long form, the selection is limited to either person or company. Additionally, you can define how the main responsible person is visually marked—whether by an arrow, a checkmark, a star, or bold text (4), to ensure a clear assignment of responsibilities.
According to Entry in Report Item:
Person & Function:
Report Item Settings / Print (1)
Start the report on the cover page (2)
Do not print report items that have no content (3)
Define how many contents from the report item history should be printed (4) e.g., the last three contents
Highlight new report item contents (5) (Example in Chapter 14.6)
In the print settings for report items (1), you have control over the presentation of your reports.
You can choose to start the report directly on the cover page (2) and specify that report items without content do not appear in the printout (3).
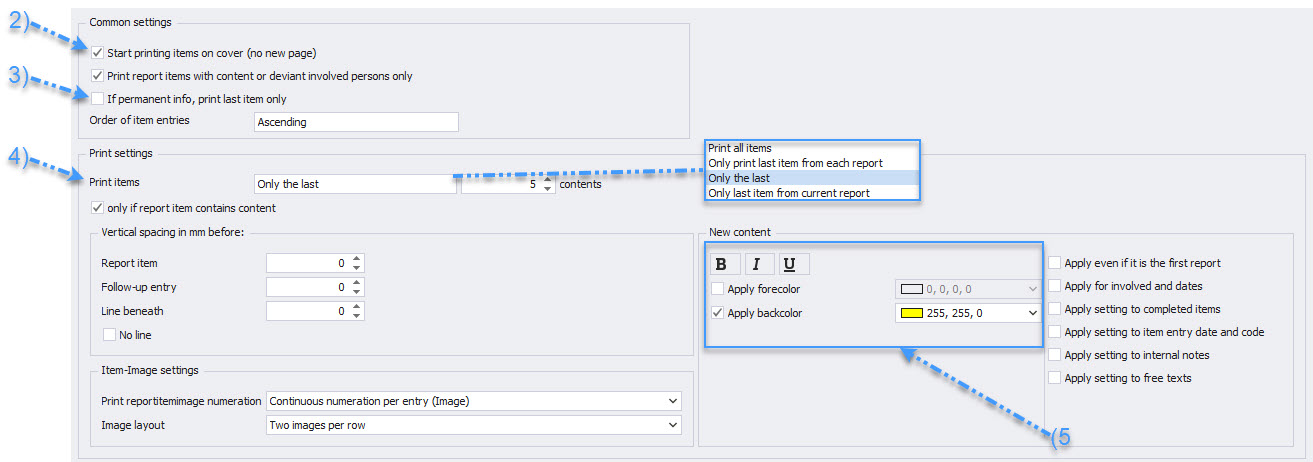
You can also decide how extensively the history of the report items is presented, for example, by printing the last three contents (4).
Additionally, you have the option to highlight new contents within a report item in the printout (5) to clearly indicate changes or updates.
In the Appointment Settings (1), you can specify that overdue or currently due appointments are highlighted in color in your reports (2). This visual distinction makes it easier to identify priorities and deadlines at a glance.
Within the Report Item Settings for Status (1), there are numerous options for customization.
You can modify both the display text and the layout of each status according to your requirements (2). Adding a custom status is possible by clicking on the bottom empty line (3), allowing you to introduce specific labels such as "Decision," "CRQ," or "Agreement," or visualize statuses with traffic light colors (Red, Orange, Green). You can also use the checkboxes (5) to determine which status types will appear in the printouts. In the printout, the display text of the status will always be used.
Print settings can be assigned to each report collection via the Report Collection Manager (1). This allows different print settings for types like memos compared to construction meetings.
The different settings areas of the Report Collection Manager can be selected via the menu on the right side (1).
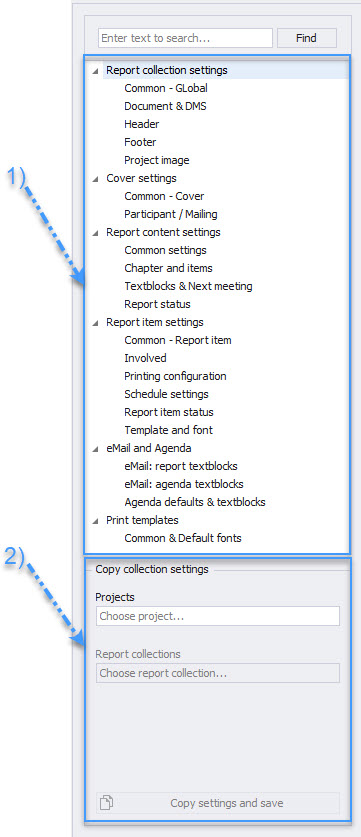
Settings can be adopted from other report collections, independent of the project (2).
General
Presence Monitor
Database Management
3.1. Imported and Exported Documents
Users & Groups
4.1. Create User
4.2. Create User Group
4.3. Assign User to Group, Remove User from Group
4.4. Set User & User License to Offline
4.5. Single Sign-On via Windows and Windows Groups
Rights Management
5.1. Central Permissions of Users and User Groups
5.2. Project-Specific Permissions of Users
Laptop & Mobile
Standard Project and Report Collection
PROMAN Support
This document describes the functions of the PROMANX Administration.
The administration includes the following areas:
An overview of user activities, such as their last check-in
Setting up and testing the connection to the SQL database
Management of users and groups
Permission management for users and groups
An overview of projects that are in laptop/offline mode
The definition of standard templates for projects and report collections
The Presence Monitor (1) provides a list of PROMAN users (2), their last program start (3), as well as their license type (4).
In the Database Management section (1), the connection to the SQL database can be configured.
Using the "Edit Connection" button (2), you can adjust the access data for the SQL instance, database, username, and password.
It is then recommended to verify whether a connection to the SQL database can be successfully established (3).
If the connection test fails, you may need to adjust settings on the firewall or the SQL instance accordingly.
When starting the meeting report with an empty SQL database, a dialog opens in which a new project can be created. A sample project is provided by the PROMAN support team.
To create a new user, click the "Add User" button (4) and enter the username and optionally the user's password in the following dialog (5).
To create a new group, click the "Add Group" button (1) and enter the name of the user group in the subsequent dialog (2)
To assign a user to a group, simply drag and drop the user into the desired group.
You can then expand the group (1) to display which users are currently assigned to it.
To remove a user from a group, select the user (2) and then click the "Remove User from Group" button (3)
With Windows authentication (1), user login is performed at program startup based on the Windows user. No password entry is required with this option.
User groups from Active Directory (2) can also be adopted as user groups in PROMAN.
In the Users & Groups section (1), PROMAN users (2) and their respective groups (3) can be managed.
Permissions for users and groups (1) can be defined via the corresponding checkboxes (2) for individual areas such as creating projects, deleting projects, etc., or adjusted according to the standard permissions (3)
Project-specific permissions can be customized for each project (1) individually for users and groups (2) within various areas (3), such as creating and editing content. If needed, a project can also be hidden from certain users and groups.
After selecting a project (1), a project permission for a user or group (2) can be added and their permissions within the project can be adjusted (3)
If needed, permissions can also be adjusted for individual report collections
After selecting a report collection (1), a project permission for a user or group (2) can be added and the permissions within the report collection (3) can be adjusted
Rights management (1) is divided into two areas: the central rights management (2) for users and user groups, and the project-specific rights management (3)
Please refer to this page for a guide on how to activate the Offline Modus: https://op.proman.at/projects/promanx-support-doku/wiki/2-dot-4-laptop-modus-activation
The laptop mode or mobile operation is used for recording data without a connection to the central database. In this mode, the projects and their associated report collections needed for logging are first transferred to a locally stored database.
After the transfer, these projects are considered checked out in the central database. Checked-out projects are write-protected in the central database, and their data remains at the state of the checkout.
A list of checked-out projects can be found in the "Laptop & Mobile" section (1)
If data loss occurs — for example, if a notebook is lost — the write protection in the central database can be lifted (2).
Caution! Any offline changes made in the meantime will be lost.
Whether a project is in stationary or mobile mode is also indicated directly in the meeting report in the blue status bar (3)
In this section, a project (1) and a report collection (2) can be defined, whose settings will automatically be used as default templates whenever a new project or report collection is created
With a right-click, you open the radial menu, which gives you access to advanced settings for various elements in the protocol view.
The drag-and-drop functionality in Proman simplifies adding files to projects. However, there are differences in how it's handled depending on whether Proman is installed locally on your computer or accessed via Remote Desktop.
Using Proman on a local computer:
With a local installation of Proman, you can drag and drop files directly into the Proman window.
Example: A company logo from a folder can be dragged directly into the designated field in Proman.
Supported formats include jpg, gif, and png.
Using Proman via Remote Desktop:
When connected via Remote Desktop, the drag-and-drop function is not available due to technical reasons.
As an alternative, please use the clipboard: Copy the desired file and paste it into Proman using the context menu (Right-click → Clipboard → "Paste").
General Notes:
The availability and functionality of the drag-and-drop feature depend on the specific Proman product version you are using. Please check your product version to determine the correct usage method.
If you have any questions or uncertainties about using Proman, you can always contact our support team.
1. How to create a new project?
2. How to manage addresses?
3. How to add comments to a report?
4. How are notifications for new comments displayed?
5. Can images or PDFs be added to comments?
6. How can you view communication between team members?
7. What should you do if you need help?
8. How to adjust the print settings for reports?
9. How to set a project logo?
10. How to change the status of a report item?
11. What is the difference between central and project-specific addresses?
12. How to ensure that all team members receive current information?
Version 5.0 - 2024
Welcome to the manual for the PROMAN Meeting Report Module. This manual serves as a comprehensive guide for navigating and making optimal use of the Meeting Report Module in PROMAN X. Whether you are a new user familiarizing yourself with the product or an experienced professional looking for advanced tips, this manual provides you with detailed instructions, insights, and tips to enhance your experience.
This manual is structured to ensure easy navigation and quick understanding, helping you get the most out of the PROMAN Meeting Report Module. Here you will find:
Getting Started: For first-time users, this section offers a step-by-step guide to setting up and starting with the PROMAN Meeting Report Module.
Features and Applications: Detailed explanations and instructions for each feature.
FAQs: Answers to frequently asked questions.
Advanced Tips: For experienced users, discover advanced features to fully leverage the PROMAN Meeting Report Module.
Your feedback and inquiries are important to us. If you have questions not covered in this manual or need further assistance, please contact our support team:
Email: service@proman.at
Phone:
From Austria +43 1 478 05 67
From Germany 0800 589 0129
Website: www.proman.at
We are committed to providing the support you need to ensure that your experience with the PROMAN Meeting Report Module is outstanding.
Thank you for choosing the PROMAN Meeting Report Module. We hope this manual helps you to use the PROMAN Meeting Report Module fully and effectively.